Previously, in the first part of this article, we used Cutter, a GUI for radare2, to statically analyze APT33’s Dropshot malware. We also used radare2’s Python scripting capabilities in order to decrypt encrypted strings in Dropshot. If you didn’t read the first part yet, I suggest you do it now.
Today’s article will be shorter, now that we are familiar with cutter and r2pipe, we can quickly analyze another interesting component of Dropshot — an encrypted resource that includes Dropshot’s actual payload. So without further ado, let’s start.
Downloading and installing Cutter
Cutter is available for all platforms (Linux, OS X, Windows). You can download the latest release here. If you are using Linux, the fastest way to use Cutter is to use the AppImage file.
If you want to use the newest version available, with new features and bug fixes, you should build Cutter from source by yourself. It isn’t a complicated task and it is the version I use.
First, you must clone the repository:
git clone --recurse-submodules https://github.com/radareorg/cutter
cd cutter
Building on Linux:
./build.sh
Building on Windows:
prepare_r2.bat
build.bat
If any of those do not work, check the more detailed instruction page here
Dropshot \ StoneDrill
As in the last part, we’ll analyze Dropshot, which is also known by the name StoneDrill. It is a wiper malware associated with the APT33 group which targeted mostly organizations in Saudi Arabia. Dropshot is a sophisticated malware sample, that employed advanced anti-emulation techniques and has a lot of interesting functionalities. The malware is most likely related to the infamous Shamoon malware. Dropshot was analyzed thoroughly by Kaspersky and later on by FireEye. In this article, we’ll focus on decrypting the encrypted resource of Dropshot which contains the actual payload of the malware.
The Dropshot sample can be downloaded from here(password: infected). I suggest you star (★) the repository to get updates on more radare2 tutorials 🙂
Please, be careful when using this sample. It is a real malware, and more than that, a wiper! Use with caution!
Since we’ll analyze Dropshot statically, you can use a Linux machine, as I did.
As a reverse engineer and malware researcher, the tools I use are super important for me. I have invested hours and hours in creating the best malware analysis environment for myself and chose the best tools for me and my needs. For the last two years, radare2 is my go-to tool for a lot of reverse-engineering tasks such as automating RE related work, scripting, CTFing, exploitation and more. That said, I almost never used radare2 for malware analysis, or more accurately, for analysis of malware for Windows. The main reason was that radare2 command-line interface felt too clumsy, complicated and an over-kill. IDA Pro was simply better for these tasks, a quick inspection of functions, data structures, renaming, commenting, et cetera. It felt more intuitive for me and that what I was searching for while doing malware analysis. And then came Cutter.
Cutter
Along the years, the radare2 community had tried to develop many different graphic-interfaces for radare2. None of them came even close to Cutter. Cutter is a QT C++ based GUI for radare2. In my opinion, it is the GUI that radare2 deserves. To quote from Cutter’s Github page:
Cutter is not aimed at existing radare2 users. It instead focuses on those whose are not yet radare2 users because of the learning curve, because they don’t like CLI applications or because of the difficulty…
Cutter is a young project, only one-year-old, and it is the official GUI of radare2 (the first and only GUI to be announced “official”). Cutter is a cross-platform GUI that aims to export radare2’s plenty of functionality into a user-friendly and modern GUI. In this post, I’ll show you some of Cutter’s features and how I work with it. To be honest, Cutter is intuitive so you probably won’t need me to show you around, but just in case.
Downloading and installing Cutter
Cutter is available for all platforms (Linux, OS X, Windows). You can download the latest release here. If you are using Linux, the fastest way to use Cutter is to use the AppImage file.
If you want to use the newest version available, with new features and bug fixes, you should build Cutter from source by yourself. It isn’t a complicated task and it is the version I use.
First, you must clone the repository:
git clone --recurse-submodules https://github.com/radareorg/cutter
cd cutter
Building on Linux:
./build.sh
Building on Windows:
prepare_r2.bat
build.bat
If any of those do not work, check the more detailed instruction page here.
Dropshot \ StoneDrill
Dropshot, also known as StoneDrill, is a wiper malware associated with the APT33 group which targeted mostly organizations in Saudi Arabia. Dropshot is a sophisticated malware sample, that employed advanced anti-emulation techniques and has a lot of interesting functionalities. The malware is most likely related to the infamous Shamoon malware. Dropshot was analyzed thoroughly by Kaspersky and later on by FireEye. In this article, we’ll focus on analyzing how Dropshot decrypted the strings inside it in order to evade analysis. In part 2 of this article, which will be published soon, we’ll focus on decrypting the encrypted resource of Dropshot which contains the actual payload of the malware.
The Dropshot sample can be downloaded from here(password: infected). I suggest you star (★) the repository to get updates on more radare2 tutorials 🙂
Please, be careful when using this sample. It is a real malware, and more than that, a wiper! Use with caution!
Since we’ll analyze Dropshot statically, you can use a Linux machine, as I did.
It took me three months to finish writing this article. I had so many tasks on my to-do list that sadly this one was pushed down to the bottom of the list. Last weekend I made a promise to myself that until Sunday I’m going to finish writing it, I successfully kept my word and here it is, another radare2 tutorial.
Today we’ll solve a very nice challenge, “packedup”, written by ad3l for r2con 2017 competition. It is not the first writeup that I publish from r2con competition, you can check out “Reverse engineering a Gameboy ROM with radare2” as well, make sure not to miss the cool swags I got from winning the competition.
This article is aimed to those of you who are familiar with radare2. If you are not, I suggest you to start from part 1 of my series “A Journey Into Radare2”.
So, without further ado, let’s dig into the binary.
Getting radare2
Installation
Radare2’s development is pretty quick – the project evolves every day, therefore it’s recommended to use the current git version over the stable one. Sometimes the stable version is less stable than the current git version!
$ git clone https://github.com/radare/radare2.git
$ cd radare2
$ ./sys/install.sh
If you don’t want to install the git version or you want the binaries for another machine (Windows, OS X, iOS, etc.) check out the download page at the radare2 website.
Updating
As I said before, it is highly recommended to always use the newest version of r2 from the git repository. All you need to do to update your r2 version from the git is to execute:
$ ./sys/install.sh
And you’ll have the latest version from git. I usually update my version of radare2 in the morning with a scheduled task, so I can wake up to the latest version available. If you’re using radare2 often, I recommend you do the same.
packedup
You can download packedup from here. I suggest you to star (★) the repository to get updates about more radare2 tutorials 🙂
First thing to do, obviously, is to execute the binary and get a basic feeling of what we are going to face.
$ ./packedup
Welcome to packedup for r2crackmes :)
Flag << MEGABEETS
Try again!
packedup is executed, it requests us to give it a flag. It then probably does some calculations at the backend to see if the inputted flag is the right one. I entered “MEGABEETS” which is likely not the correct flag and finished with the fail message — “Try again!”.
Reversing time!
Now for our favorite part, let’s open the binary with radare2 and try to figure out how packedup is checking the submitted flag:
$r2./packedup — Here be dragons.
[0x004004d0]> aaa [x] Analyze all flags starting with sym. and entry0 (aa) [x] Analyze len bytes of instructions for references (aar) [x] Analyze function calls (aac) [*] Use -AA or aaaa to perform additional experimental analysis. [x] Constructing a function name for fcn.* and sym.func.* functions (aan)
Analysis
I usually begin with executing aa (analyze all) or with aas (to analyze functions, symbols and more). The name is misleading because there is a lot more to analyze (check aa?) but it’s enough to start with for most of the binaries I examined. This time we’ll start straight with aaa to make things simpler and due to the binary’s small size. You can also run radare2 with the -A flag to analyze the binary straight at startup using aaa (e.g r2 -A ./packedup).
Note: as I mentioned in the previous posts, starting with aaa is not always the recommended approach since analysis is very complicated process. I wrote more about it in this answer — read it to better understand why.
Getting Information
So now that we opened our binary with radare2, we have been located automatically at the program’s entrypoint. But before we start working on the code itself It’s a good approach to get to know our binary characteristics. radare2 can show us the information we need using the i command (I removed some information for the sake of readability):
[0x004004d0]> i
...
file ./packedup
format elf64
iorw false
mode -r-x
size 0x1878
humansz 6.1K
type EXEC (Executable file)
arch x86
...
bintype elf
bits 64
...
endian little
...
intrp /lib64/ld-linux-x86-64.so.2
lang c
...
machine AMD x86-64 architecture
stripped true
...
The i command used for getting info about the opened file. It’s a wrapper around rabin2 which is an information extractor tool in the radare2 framework. radare2 offers us tons amount of information about the binary. Check out i? to list the information’s subcommands.
packedup is a 64-bit stripped ELF binary. Cool. Let’s move on.
Welcome back to the second part of our journey into the guts of radare2! In this part we’ll cover more of the features of radare2, this time with the focus on binary exploitation.
A lot of you waited for the second part, so here it is! Hope to publish the next part faster, much faster. If you didn’t read the first partof the series I highly recommend you to do so. It describes the basics of radare2 and explains many of the commands that I’ll use here.
In this part of the series we’ll focus on exploiting a simple binary. radare2 has many features which will help us in exploitation, such as mitigation detection, ROP gadget searching, random patterns generation, register telescoping and more. You can find a Reference Sheet at the end of this post. Today I’ll show you some of these great features and together we’ll use radare2 to bypass nx protected binary on an ASLR enabled system. I assume that you are already familiar with the following prerequisites:
Our binary this time is quite similar to the one from the previous post with a few slight changes to the main() function:
Compiled without -z execstac to enable NX bit
Receives user input with scanf and not from program’s arguments
Uses mostly puts to print to screen
Little changes to the program’s output
This was the previous main():
int main(int argc, char *argv[])
{
    printf("\n  .:: Megabeets ::.\n");
    printf("Think you can make it?\n");
    if (argc >= 2 && beet(argv[1]))
    {
        printf("Success!\n\n");
    }
    else
        printf("Nop, Wrong argument.\n\n");

    return 0;
}
And now main looks like this:
int main(int argc, char *argv[])
{
    char *input;
    puts("\n  .:: Megabeets ::.\n");
    puts("Show me what you got:");

    scanf("%ms", &input);
    if (beet(input))
    {
        printf("Success!\n\n");
    }
    else
        puts("Nop, Wrong argument.\n\n");

    return 0;
}
The functionality of the binary is pretty simple and we went through it in the previous post — It asks for user input, performs rot13 on the input and compares it with the result of rot13 on the string “Megabeets”. Id est, the input should be ‘Zrtnorrgf’.
$ ./megabeets_0x2

  .:: Megabeets ::.

Show me what you got:
blablablabla
Nop, Wrong argument.

$ ./megabeets_0x2

  .:: Megabeets ::.

Show me what you got:
Zrtnorrgf
Success!
It’s all well and good but today our post is not about cracking a simple Crackme but about exploiting it. Wooho! Let’s get to the work.
As with every exploitation challenge, it is always a good habit to check the binary for implemented security protections. We can do it with rabin2 which I demonstrated in the last post or simply by executing i from inside radare’s shell. Because we haven’t opened the binary with radare yet, we’ll go for the rabin2 method:
$ rabin2 -I megabeets_0x2

arch     x86
binsz    6072
bintype  elf
bits     32
canary   false
class    ELF32
crypto   false
endian   little
havecode true
intrp    /lib/ld-linux.so.2
lang     c
linenum  true
lsyms    true
machine  Intel 80386
maxopsz  16
minopsz  1
nx       true
os       linux
pcalign  0
pic      false
relocs   true
relro    partial
rpath    NONE
static   false
stripped false
subsys   linux
va       true
As you can see in the marked lines, the binary is NX protected which means that we won’t have an executable stack to rely on. Moreover, the file isn’t protected with canaries , pic or relro.
Update (2020): Since writing this article, it has become, in a way, the go-to tutorial for learning radare2. Your feedback was amazing and I am very happy for the opportunity to teach new people about radare2.
A lot has changed since I wrote this tutorial, both with radare2 and with me. I am now, for several years, a core member in the radare2 team and a maintainer of Cutter, a modern, GUI-based, reverse engineering framework that is powered by radare2.
This is an updated version of the original tutorial. I will keep it updated every now and then to make sure it is up-to-date with the changes in radare2.
Enjoy!
Prologue
I was playing a lot with radare2 in the past years, ever since I began participating in CTFs and got deeper into RE and exploitation challenges. I found radare2 very helpful with many CTFs tasks and my solutions had shortened significantly. It’s also my go-to tool for malware analysis tasks such as configuration retrievals. Sadly, I believe that only few people are familiar with radare2. It might be because they’re afraid to break out of their comfort zone (IDA Pro, x64dbg, Ghidra, OllyDBG, gdb) or they have simply not heard of it. Either way, I honestly believe that you must include radare2 in your toolbox.
Because I got really enthusiastic about the project and I want more and more researchers to be familiar with it, use it and hopefully contribute to the project, I decided to create a series of articles and use-cases of r2. Since these articles aim to teach you the basics of radare2, its features, and capabilities, I’ll explain much more than you actually need to know in order to solve each task.
Welcome to IDA 10.0. (see radare2/doc/fortunes.fun for more fortunes)
radare2
radare2 is an open-source framework for reverse engineering and binary analysis which implements a rich command-line interface for disassembling, analyzing data, patching binaries, comparing data, searching, replacing, visualizing and more. It has great scripting capabilities, it runs on all major platforms (GNU/Linux, Windows, *BSD, iOS, OSX, Solaris…) and it supports tons of architectures and file formats. But maybe above all of its features stands the ideology – radare2 is absolutely free.
This framework is composed of a set of utilities that can be used either together from r2 shell or independently – We’ll get familiar with tools such as rahash2, rabin2 and ragg2. Together they create one of the most powerful toolsets in the field of static and dynamic analysis, hex editing and exploitation (in the following articles I’ll dive deeper into developing exploits using radare2).
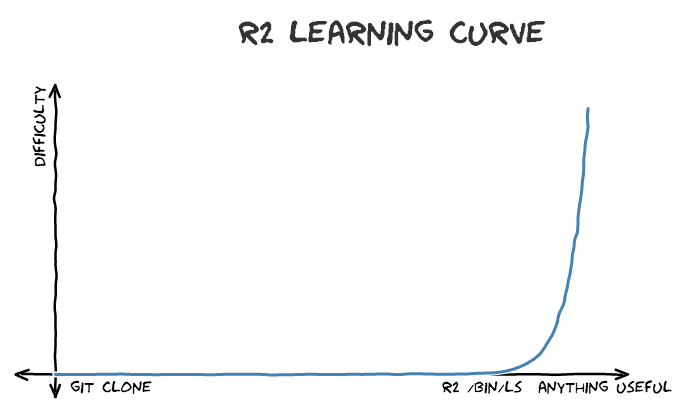
It is important to note that r2’s learning curve is pretty steep – although it has an amazing GUI called Cutter, which I co-maintain, it is still young to compete with more mature RE applications such as IDA or Ghidra. The CLI, however, including its Visual Mode, is still the core of radare2 and where its power lays. Because of its complexity, I’ll try to make things as clear and simple as I can.
Radare2’s development is pretty quick – the project evolves every day. Therefore it’s recommended to use the current git version over the release one. Sometimes the release version is less stable than the current git version because of bug fixes!
git clone https://github.com/radare/radare2.git
cd radare2
./sys/install.sh
If you don’t want to install the git version or you want the binaries for another machine (Windows, OS X, iOS, etc) download the release from github.
Updating
As I said before, it is highly recommended to always use the newest version of r2 from the git repository. All you need to do to update your r2 version from the git is to execute:
./sys/install.sh
And you’ll have the latest version from git. I usually update my version of radare2 in the morning, while watching cat videos.
Uninstalling
I Can’t think of a reason for you to uninstall radare2 so early in the article but if you do want to, you can simply execute:
Now that radare2 is installed on your system and you have downloaded the binary, we are ready to start exploring the basic usage of radare2. I’ll work on a Linux machine but most of the commands and explanations (if not all of them) would be the same for Windows machines and others.
Command Line Arguments
As most command-line utilities, the best approach to reveal the list of the possible arguments is to execute the program with the -h flag.
r2 -h
I won’t paste here the full output. Instead, I’ll point out those which I usually use in my daily work:
Usage: r2 [-ACdfLMnNqStuvwzX] [-P patch] [-p prj] [-a arch] [-b bits] [-i file]
          [-s addr] [-B baddr] [-m maddr] [-c cmd] [-e k=v] file|pid|-|--|=
 -            same as 'r2 malloc://512'
 -a [arch]    set asm.arch
 -A           run 'aaa' command to analyze all referenced code
 -b [bits]    set asm.bits
 -B [baddr]   set base address for PIE binaries
 -c 'cmd..'   execute radare command
 -d           debug the executable 'file' or running process 'pid'
 -i [file]    run script file
 -k [OS/kern] set asm.os (linux, macos, w32, netbsd, ...)
 -l [lib]     load plugin file
 -p [prj]     use project, list if no arg, load if no file
 -w           open file in write mode