
Prologue
It took me three months to finish writing this article. I had so many tasks on my to-do list that sadly this one was pushed down to the bottom of the list. Last weekend I made a promise to myself that until Sunday I’m going to finish writing it, I successfully kept my word and here it is, another radare2 tutorial.
Today we’ll solve a very nice challenge, “packedup”, written by ad3l for r2con 2017 competition. It is not the first writeup that I publish from r2con competition, you can check out “Reverse engineering a Gameboy ROM with radare2” as well, make sure not to miss the cool swags I got from winning the competition.
This article is aimed to those of you who are familiar with radare2. If you are not, I suggest you to start from part 1 of my series “A Journey Into Radare2”.
So, without further ado, let’s dig into the binary.
Getting radare2
Installation
Radare2’s development is pretty quick – the project evolves every day, therefore it’s recommended to use the current git version over the stable one. Sometimes the stable version is less stable than the current git version!
$ git clone https://github.com/radare/radare2.git
$ cd radare2
$ ./sys/install.sh
If you don’t want to install the git version or you want the binaries for another machine (Windows, OS X, iOS, etc.) check out the download page at the radare2 website.
Updating
As I said before, it is highly recommended to always use the newest version of r2 from the git repository. All you need to do to update your r2 version from the git is to execute:
$ ./sys/install.sh
And you’ll have the latest version from git. I usually update my version of radare2 in the morning with a scheduled task, so I can wake up to the latest version available. If you’re using radare2 often, I recommend you do the same.
packedup
You can download packedup from here. I suggest you to star (★) the repository to get updates about more radare2 tutorials 🙂
First thing to do, obviously, is to execute the binary and get a basic feeling of what we are going to face.
$ ./packedup
Welcome to packedup for r2crackmes :)
Flag << MEGABEETS
Try again!
packedup is executed, it requests us to give it a flag. It then probably does some calculations at the backend to see if the inputted flag is the right one. I entered “MEGABEETS” which is likely not the correct flag and finished with the fail message — “Try again!”.
Reversing time!
Now for our favorite part, let’s open the binary with radare2 and try to figure out how packedup is checking the submitted flag:
| $ r2 ./packedup — Here be dragons. [0x004004d0]> aaa [x] Analyze all flags starting with sym. and entry0 (aa) [x] Analyze len bytes of instructions for references (aar) [x] Analyze function calls (aac) [*] Use -AA or aaaa to perform additional experimental analysis. [x] Constructing a function name for fcn.* and sym.func.* functions (aan) |
Analysis
I usually begin with executing aa (analyze all) or with aas (to analyze functions, symbols and more). The name is misleading because there is a lot more to analyze (check aa?) but it’s enough to start with for most of the binaries I examined. This time we’ll start straight with aaa to make things simpler and due to the binary’s small size. You can also run radare2 with the -A flag to analyze the binary straight at startup using aaa (e.g r2 -A ./packedup).
Note: as I mentioned in the previous posts, starting with
aaais not always the recommended approach since analysis is very complicated process. I wrote more about it in this answer — read it to better understand why.
Getting Information
So now that we opened our binary with radare2, we have been located automatically at the program’s entrypoint. But before we start working on the code itself It’s a good approach to get to know our binary characteristics. radare2 can show us the information we need using the i command (I removed some information for the sake of readability):
[0x004004d0]> i
...
file ./packedup
format elf64
iorw false
mode -r-x
size 0x1878
humansz 6.1K
type EXEC (Executable file)
arch x86
...
bintype elf
bits 64
...
endian little
...
intrp /lib64/ld-linux-x86-64.so.2
lang c
...
machine AMD x86-64 architecture
stripped true
...
The
icommand used for getting info about the opened file. It’s a wrapper aroundrabin2which is an information extractor tool in the radare2 framework. radare2 offers us tons amount of information about the binary. Check outi?to list the information’s subcommands.
packedup is a 64-bit stripped ELF binary. Cool. Let’s move on.
Strings
One of my favorite ways to figure out where to start my analysis is to check the binary for indicative strings, and especially where they’re referenced from. To list all the strings in the data section we’ll use iz:
| [0x004004d0]> iz 001 0x000007d0 0x004007d0 46 47 (.rodata) ascii Welcome to packedup for r2crackmes :)\nFlag << 002 0x00000800 0x00400800 11 12 (.rodata) ascii Try again!\n 003 0x0000080d 0x0040080d 26 27 (.rodata) ascii Yep! you got the flag 🙂 \n |
Nice! We have our “welcome” message and both the “Good-boy” and the “Bad-boy” messages. Let’s see where each is referenced from. To do this we’ll use a simple trick that radare2 has – built in loops:
| [0x004004d0]> axt @@ str.* main 0x400619 [data] mov esi, str.Welcome_to_packedup_for_r2crackmes_:___Flag main 0x4006b8 [data] mov esi, str.Try_again main 0x4006de [data] mov esi, str.Yep__you_got_the_flag_: |
This command reveals us more of radare2 features. The
axtcommand is used to “find data/code references to this address” (seeax?).
@@is like foreach iterator sign, used to repeat a command over a list of offsets (see@@?), andstr.*is a wildcard for all the flags that start withstr..This combination helps me not just to list the strings but also to list the function name, where they’re used and the referenced instruction.
Seeking
As I mentioned before, all this time we were at the entrypoint of the program, now it’s time to move on. The strings we just listed are all referenced by ‘main’. In order to navigate from offset to offset we need to use the ‘seek’ command, represented by s. As you already know, appending ? to (almost) every command is the answer to all your problems.
| [0x08048370]> s? |Usage: s # Seek commands | s Print current address | s addr Seek to address | s- Undo seek | s- n Seek n bytes backward | s– Seek blocksize bytes backward | s+ Redo seek | s+ n Seek n bytes forward | s++ Seek blocksize bytes forward | s[j*=] List undo seek history (JSON, =list, *r2) | s/ DATA Search for next occurrence of ‘DATA’ | s/x 9091 Search for next occurrence of \x90\x91 | s.hexoff Seek honoring a base from core->offset | sa [[+-]a] [asz] Seek asz (or bsize) aligned to addr | sb Seek aligned to bb start | sC[?] string Seek to comment matching given string | sf Seek to next function (f->addr+f->size) | sf function Seek to address of specified function | sg/sG Seek begin (sg) or end (sG) of section or file | sl[?] [+-]line Seek to line | sn/sp Seek next/prev scr.nkey | so [N] Seek to N next opcode(s) | sr pc Seek to register |
So basically, the seek command accepts an address or math expression as an argument. The expression can be math operations, flag, or memory access operations. Since we want to seek to the main function, we don’t need anything special, we can do it by executing s main.
| [0x004004d0]> s main [0x0040060c]> |
Disassembly
Now that we are at the main function we want to print its disassembly to examine it. There are many ways to disassemble a function using radare. You can use pdf (print disassembly function) or you can use more interactive ways – the Visual Mode (v) and the Visual Graph Mode (VV). You can use the way you find most comfortable to you. I usually use the visual modes since they’re more rich and interactive. Sadly, because this is not radare2 101 writeup I’m not going to explain how to use it, I explained it thoroughly in the previous articles.
Visual Graph Mode vs Visual Mode
Let’s start with having a look at the first block of main:
| [0x0040060c]> pdf ╭ (fcn) main 244 │ main (); │ ; var int local_10h @ rbp-0x10 │ ; var int local_ch @ rbp-0xc │ ; var int local_8h @ rbp-0x8 │ ; JMP XREF from 0x00400605 (entry2.init) │ ; DATA XREF from 0x004004ed (entry0) │ 0x0040060c 55 push rbp │ 0x0040060d 4889e5 mov rbp, rsp │ 0x00400610 4883ec10 sub rsp, 0x10 │ ; DATA XREF from 0x00400653 (main) │ ; DATA XREF from 0x004005e7 (entry2.init) │ 0x00400614 ba30000000 mov edx, 0x30 │ 0x00400619 bed0074000 mov esi, str.Welcome_to_packedup_for_r2crackmes_:___Flag ; 0x4007d0 ; “Welcome to packedup for r2crackmes :)\nFlag << “ │ 0x0040061e bf01000000 mov edi, 1 │ 0x00400623 b800000000 mov eax, 0 │ 0x00400628 e853feffff call sym.imp.write ; ssize_t write(int fd, void *ptr, size_t nbytes) │ 0x0040062d ba2c000000 mov edx, 0x2c ; ‘,’ ; 44 │ 0x00400632 be80106000 mov esi, 0x601080 │ 0x00400637 bf00000000 mov edi, 0 │ 0x0040063c b800000000 mov eax, 0 │ 0x00400641 e84afeffff call sym.imp.read ; ssize_t read(int fildes, void *buf, size_t nbyte) │ 0x00400646 4898 cdqe │ 0x00400648 488945f8 mov qword [local_8h], rax │ 0x0040064c c745f0000000. mov dword [local_10h], 0 │ 0x00400653 b814064000 mov eax, 0x400614 │ 0x00400658 bbf6064000 mov ebx, 0x4006f6 │ 0x0040065d 29c3 sub ebx, eax │ 0x0040065f 31c9 xor ecx, ecx |
After the function’s prologue, we can see arguments passed (System V AMD64 ABI) to write() to print the “Welcome” message and then another arguments passed to read() to read stdin input. read() is reading 0x2c (Decimal: 44) bytes from stdin and stores them into a buffer at 0x601080. We can assume that the flag would probably be 44 characters long. Let’s rename the address of our input so it’ll be better for us to recognize this address in the disassembly:
| [0x0040060c]> f loc.our_input = 0x601080 |
fis used to create flags, a “bookmark” to a certain address. For more information checkf?and read the chapter about flags in radare2book.
Then the program stores the number of bytes read into a local variable. At 0x400653 the program is moving an address (0x400614) to eax and another address (0x4006f6) to ebx. The first address is the first instruction after main‘s prologue and the second is the last instruction before main exits. So basically we can say that eax and ebx are storing the start and the end of main. Immediately after that eax is subtracted from ebx so now ebx will store the difference between these two addresses.
In the next block, the program uses the bytes of the code itself in a loop until it finishes to calculate some initial value.
| … │ 0x00400653 b814064000 mov eax, 0x400614 │ 0x00400658 bbf6064000 mov ebx, 0x4006f6 │ 0x0040065d 29c3 sub ebx, eax │ 0x0040065f 31c9 xor ecx, ecx │ ; JMP XREF from 0x0040066b (main) │ ╭─> 0x00400661 670208 add cl, byte [eax] │ ⁝ 0x00400664 c1c904 ror ecx, 4 │ ⁝ 0x00400667 ffc0 inc eax │ ⁝ 0x00400669 ffcb dec ebx │ ╰─< 0x0040066b 75f4 jne 0x400661 │ 0x0040066d 89ca mov edx, ecx … |
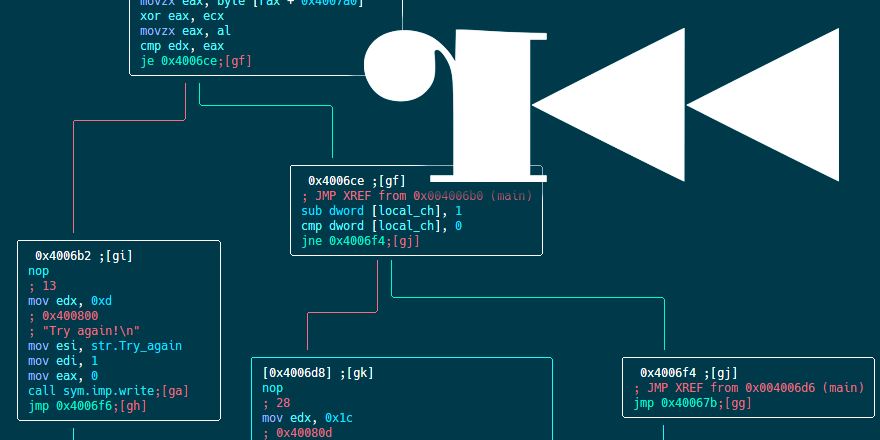
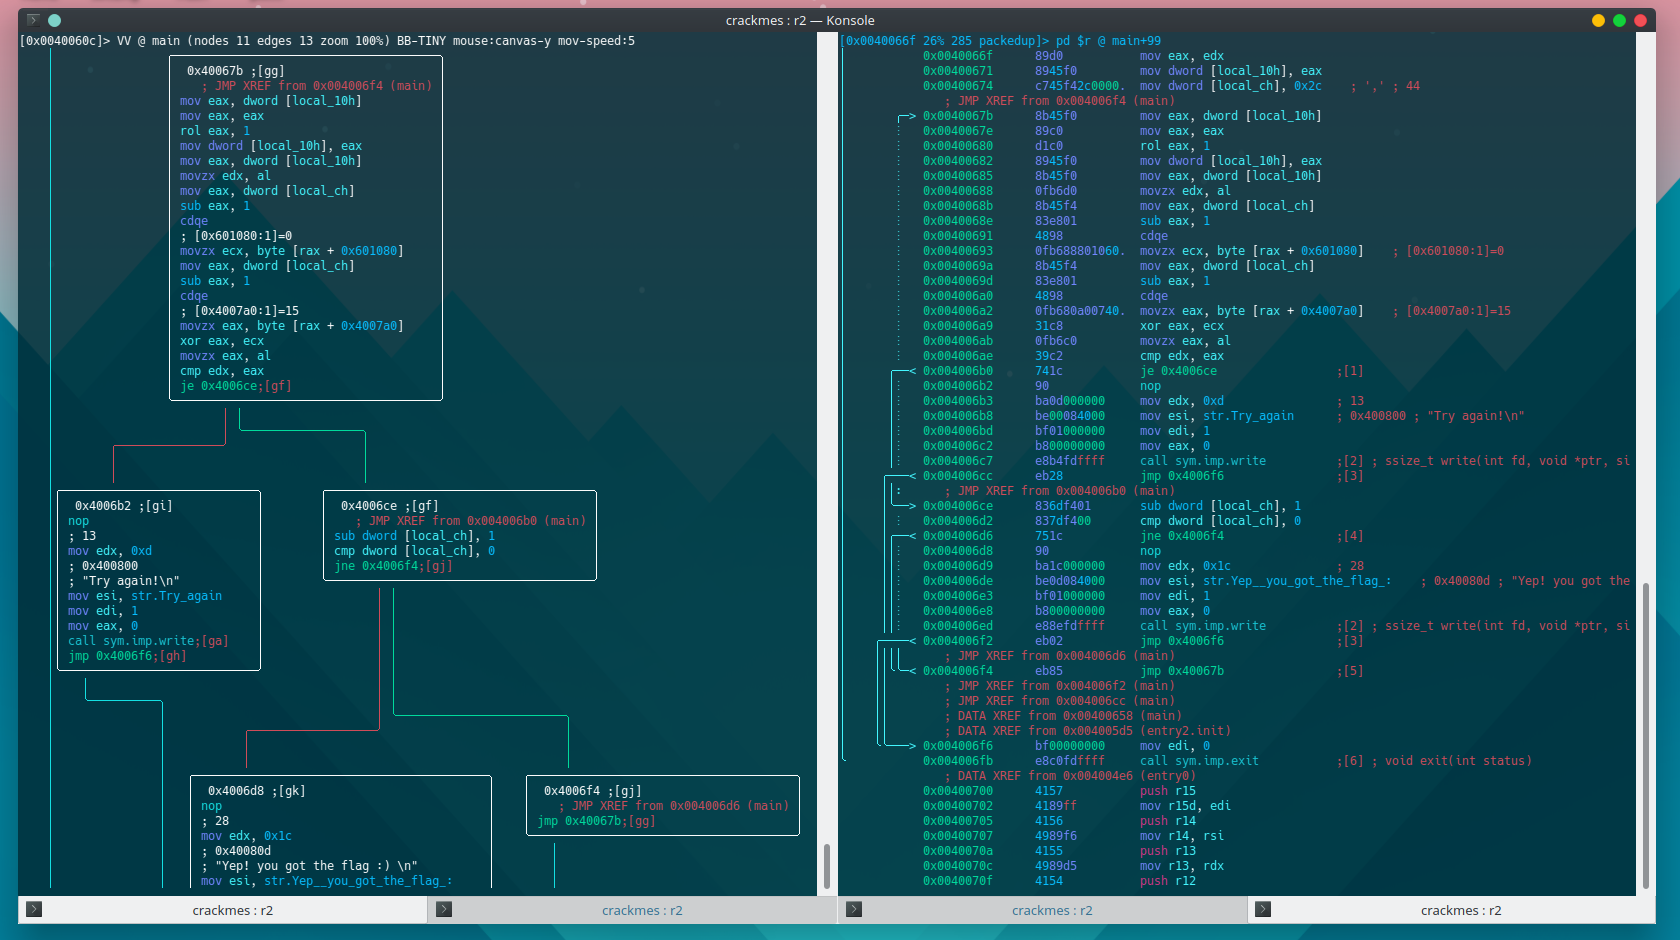
Now for a fun part. In the next loop we can see how to program is validating our input. First, let’s have a look at the most relevant part of the code:
| │ 0x0040066d 89ca mov edx, ecx │ 0x0040066f 89d0 mov eax, edx │ 0x00400671 8945f0 mov dword [local_10h], eax │ 0x00400674 c745f42c0000. mov dword [local_ch], 0x2c ; ‘,’ ; 44 │ ; JMP XREF from 0x004006f4 (main) │ 0x0040067b 8b45f0 mov eax, dword [local_10h] │ 0x0040067e 89c0 mov eax, eax │ 0x00400680 d1c0 rol eax, 1 │ 0x00400682 8945f0 mov dword [local_10h], eax │ 0x00400685 8b45f0 mov eax, dword [local_10h] │ 0x00400688 0fb6d0 movzx edx, al │ 0x0040068b 8b45f4 mov eax, dword [local_ch] │ 0x0040068e 83e801 sub eax, 1 │ 0x00400691 4898 cdqe │ 0x00400693 0fb688801060. movzx ecx, byte [rax + 0x601080] ; [0x601080:1]=0 │ 0x0040069a 8b45f4 mov eax, dword [local_ch] │ 0x0040069d 83e801 sub eax, 1 │ 0x004006a0 4898 cdqe │ 0x004006a2 0fb680a00740. movzx eax, byte [rax + 0x4007a0] ; [0x4007a0:1]=15 │ 0x004006a9 31c8 xor eax, ecx │ 0x004006ab 0fb6c0 movzx eax, al │ 0x004006ae 39c2 cmp edx, eax │ ╭─< 0x004006b0 741c je 0x4006ce |
The value that was calculated in the previous loop is now moved into edx (at 0x40066d), which in turn is moving it to eax which is moving it to [local_10h]. Confused? me too. To put things simple, the value that was calculated in the previous loop is now at [local_10h]. Now we are starting the validation loop. The first instruction of this loop moves the value of [local_10h] to eax, then, at 0x400680 the value at eax is being left-rotated with 1 byte and assigned again to [local_10h]. At 0x400688 the lower byte (al) of the value is moved into edx. At address 0x400693 the program takes one char from our input and assign it to ecx. After that, at 0x4006a2 the program takes one byte from [rax + 0x4007a0] and assigns it to eax. Let’s see what we have at 0x4007a0:
| [0x0040060c]> px 44 @ 0x4007a0 – offset – 0 1 2 3 4 5 6 7 8 9 A B C D E F 0123456789ABCDEF 0x004007a0 0fc9 a886 ace0 1893 8aaf 91a2 e464 7a5a .............dzZ 0x004007b0 088b a89a b4d1 1f84 b4d1 7152 1c8a 80d2 ..........qR.... 0x004007c0 1495 8297 80d2 1f90 8f91 93a6 ............ |
Cool! It is a predefined byte array of length 44. It is obviously been used somehow in the comparison. Let’s flag it to loc.predefined_array using:
| [0x0040060c]> f loc.predefined_array = 0x4007a0 |
Just for a reminder before we continue. edx now contains the lower byte of rol(initial_value), eax contains the byte in index 0x2C (Decimal: 44) of the byte array at loc.predefined_array and ecx holds the last character of our input.
At 0x4006a9, ecx (the last char of our input) is bitwise XOR’d with eax (last value of the predefined array), the result is stored in eax. Then al is zero-extended moved into eax and then eax is compared with edx (The lower byte of rol(initial_value)). It will be easier to understand this operation using the following pseudo-python example:
key = 0x???????? # Our initial_value
our_input = "A" * 44
predefined_array = [0x0fc9, ... ,0x93a6]

if ( ord(our_input[-1]) ^ predefined_array[-1] ) == ( key & 0xff ):
    return True
If the result is indeed equal, i.e. ECX ^ EAX == EDX the loop is repeating itself with the next character from our input (2nd from the end), the next character from the predefined array (again, 2nd from the end) and with the result of rol(key). key is actually the result of performing left-rotation on initial_value, since this value changed in every rotation it isn’t “initial” anymore so now we’ll call it key.
The solution: 1st try
Now that we understood the logic of the program we can move to find a solution for this crackme. The key insight from the previous paragraphs is the understanding that there is a loop that contains an equation with three variables: ECX ^ EAX = EDX. We know that both EAX and EDX are predictable since they should always stays the same. EAX is coming from the static-predefined byte-array and EDX is the result of n times key = rol(key) where n equals the number of the current iteration in our loop. The only variable that changes is EAX which is coming from our input.
So how can we know what input should we give to the program in order to make the equation true? We’ll use one of the coolest properties of Bitwise XOR — XOR is an involutory function (well, not exactly). Thus, and bear with me for a simple math, that means:
ECX ^ EAX == EDX
EAX ^ EDX == ECX
ECX ^ EDX == EAX
And that is awesome, right?! That’s mean that given ECX and EDX we can know what the value of EAX should be, in order to make the comparison return true. All we need to do is to write a python script and figure out what is the value of initial_value (i.e. EDX, key). We’ll start from the python script and then we will figure out the initial value of the key.
First we’ll define a lambda function for rotate left:
# Rotate left lambda
rol = lambda val, r_bits, max_bits: \
    (val << r_bits%max_bits) & (2**max_bits-1) | \
    ((val & (2**max_bits-1)) >> (max_bits-(r_bits%max_bits)))
Then, we’ll create our predefined array. We’ll use radare for this:
| [0x0040060c]> pcp 44 @ 0x4007a0 import struct buf = struct.pack (“44B”, *[ 0x0f,0xc9,0xa8,0x86,0xac,0xe0,0x18,0x93,0x8a,0xaf,0x91, 0xa2,0xe4,0x64,0x7a,0x5a,0x08,0x8b,0xa8,0x9a,0xb4,0xd1, 0x1f,0x84,0xb4,0xd1,0x71,0x52,0x1c,0x8a,0x80,0xd2,0x14, 0x95,0x82,0x97,0x80,0xd2,0x1f,0x90,0x8f,0x91,0x93,0xa6]) |
The
pcsubcommands (checkpc?) is used to output the bytes in code formats of different languages as C, Python, Javascript and others.
We’ll add it to the script and define two more variables:
# Byte array from 0x004007A0, modified from the generated results of `pcp 44 @ 0x4007a0`
arr =[0x0F, 0xC9, 0xA8, 0x86, 0xAC, 0xE0, 0x18, 0x93, 0x8A, 0xAF, 0x91, 0xA2, 0xE4, 0x64, 0x7A, 0x5A, 0x08, 0x8B, 0xA8, 0x9A, 0xB4, 0xD1, 0x1F, 0x84, 0xB4, 0xD1, 0x71, 0x52, 0x1C, 0x8A, 0x80, 0xD2, 0x14, 0x95, 0x82, 0x97, 0x80, 0xD2, 0x1F, 0x90, 0x8F, 0x91, 0x93, 0xA6]

# Initial key value
key = 0xdc77df87

flag = []
And the last thing is to implement the logic and combine it all together:
# Rotate left lambda
rol = lambda val, r_bits, max_bits: \
    (val << r_bits%max_bits) & (2**max_bits-1) | \
    ((val & (2**max_bits-1)) >> (max_bits-(r_bits%max_bits)))

# Byte array from 0x004007A0, modified from the generated results of `pcp 44 @ 0x4007a0`
arr =[0x0F, 0xC9, 0xA8, 0x86, 0xAC, 0xE0, 0x18, 0x93, 0x8A, 0xAF, 0x91, 0xA2, 0xE4, 0x64, 0x7A, 0x5A, 0x08, 0x8B, 0xA8, 0x9A, 0xB4, 0xD1, 0x1F, 0x84, 0xB4, 0xD1, 0x71, 0x52, 0x1C, 0x8A, 0x80, 0xD2, 0x14, 0x95, 0x82, 0x97, 0x80, 0xD2, 0x1F, 0x90, 0x8F, 0x91, 0x93, 0xA6]

# Initial key value
key = 0x????????

flag = []

# Iterate the array backwards
for b in reversed(arr):
    # rol the key
    key = rol(key,1,32)
    # xor the 8 lower bits of the key with current byte in array
    char = chr(b ^ (key & 0xff))
    # Add char to final flag
    flag.insert(0, char)


print '[+] Flag: ', ''.join(flag)
Awesome! Now we just need to find the initial value for the key. How do we do this? We should put a breakpoint after the loop which generates the initial value and check what is the result of this loop. Let’s open radare2 in debug mode r2 -d packedup or if your radare2 shell is still open you can use the ood command.
| [0x0040060c]> ood Process with PID 1236 started… File dbg:///home/beet/Desktop/Security/r2con/crackmes/packedup reopened in read-write mode = attach 1236 1236 [0x7fb45818cf30]> |
oodis used to re-open the current file in debug mode. It is a subcommand ofoowhich responsible of handling opened files. There’s also an alias foroodwhich isdoo. I usually usedoosince it’s easier to remember and more fun to say 😉
As you can see, our seek address changed to 0x7fb45818cf30 which is an address in the memory map of the dynamic loader (ld.so). We can know it by simply execute dm.:
| [0x7fb45818cf30]> dm. /usr/lib/ld-2.26.so |
dm.is used to show the map name of the current address. You can usedmto list the memory maps of the current process. You can see more subcommand by executingdm?.
We know that the end of the loop is at 0x0040066d, this is where the result of the loop, which is in ecx, is moving into edx. Let’s put a breakpoint on this address and check the value of ecx:
| [0x7fb45818cf30]> db 0x40066d [0x7fb45818cf30]> dc Welcome to packedup for r2crackmes 🙂 Flag << Blah_blah_blah hit breakpoint at: 40066d [0x0040066d]> dr ecx 0xd477d83e |
the
d?subcommand is used for anything related to debug session.
dbstands for debug breakpoint and is used to define a breakpoint. Checkdb?for its subcommands.
dcstands for debug continue and responsible to continue the execution.
dr, debug registers, is used to display the value of a register. There are tons of subcommand todr, check it out by executingdr?
Great! So now that we have the initial value of the key we can fill the missing part of the script key = 0xd477d83e and execute it:
beet:~$ python answer.py
[+] Flag:  Hj.xIgYj{u]J*l=ok\S6?TJbgh
What? This flag doesn’t make any sense. We must have made a mistake somewhere along the way, but where?
OH right! Silly me! Remember this sentence I wrote before?
In the next block, the program uses the bytes of the code itself in a loop until it finishes to calculate some initial value.
It totally slipped my mind. Using a software breakpoint as we did when executed db 0x40066d is adding CC (INT3) to the instruction and thus it changed the result of the calculation that is done by the loop at 0x400661. The INT 3 instruction generates a special one-byte opcode (CC) that is intended for calling the debug exception handler.
The solution: 2nd try
So, we need to find a way to get the initial value of the key without changing the code itself. That’s where Hardware Breakpoints come in handy. Let’s disable the software breakpoint and put a hardware breakpoint just at the same address:
| [0x40066d]> db- 0x40066d [0x40066d]> doo Process with PID 1317 started… File dbg:///home/beet/Desktop/Security/r2con/crackmes/packedup reopened in read-write mode = attach 1317 1317 [0x7fcb28f77f30]> drx 1 0x0040066d 1 x [0x7fcb28f77f30]> dc Welcome to packedup for r2crackmes 🙂 Flag << Blah_Megabeets_Blahaaa [0x0040066d]> dr ecx 0xdc77df87 |
Awesome! This time we found the right initial value, let’s put it in the python script and find the flag:
beet:~$ python answer.py
[+] Flag: ['\xc8', '*', '\xd9', '>', 'p', '\x0e', '\xef', 'h', '\xf7', '\x91', '\x8e', '\xad', 'c', '\xa7', '\x9b', '\xaa', '\xf0', 'w', '\xd6', '%', 'k', '>', '\xe8', '\x7f', '\xc9', 'o', '\xae', '\xbd', 'k', '\xb1', '\x9d', '\\', '\xd3', 'v', '\xf3', '/', '\\', '<', '\xe8', 'k', '\xf2', '\xaf', '\x8c', '\xa9']
Come on… bummer. We failed again. So, what’s now? What are we missing? I’m sure the initial value is correct now that we used a hardware breakpoint. It is probably something in the algorithm that we missed, but what?
Now that we’re still in debug mode let’s seek again to the start of the checking loop at 0x0040067b, follow each step slowly and compare it with quotations from before where I explained it:
The assembly: 0x0040067b 8b45f0 mov eax, dword [rbp - 0x10]
The explanation:
[✓] Now we are starting the validation loop. The first instruction of this loop moves the value of
[local_10h]toeax
The assembly: 0x00400680 d1c8 ror eax, 1
The explanation:
[X] Then, at 0x400680 the value at
eaxis being left-rotated with 1 byte.
Wait a minute! It was left-rotated (rol eax, 1, now it’s right-rotated (ror eax, 1)?! Of course we’ll get a wrong flag, our algorithm was all wrong. But how did it changed?
To understand that we should first put a hardware breakpoint on write access to this address (0x00400680) to see where this address is changed from.
| [0x40066d]> doo Process with PID 1611 started… File dbg:///home/beet/Desktop/Security/r2con/crackmes/packedup reopened in read-write mode = attach 1611 1611 [0x7fc43ae24f30]> drx 1 0x00400680 1 w [0x7fc43ae24f30]> dc [0x00400600]> |
The debug stopped at 0x400600, let’s print the instruction in this address:
| [0x00400600]> pd 1 0x00400600 67c6406dc8 mov byte [eax + 0x6d], 0xc8 |
That’s it! It modify the instruction on this address. If before the opcodes of rol eax, 1 were d1c0, now it changes it to d1c8! We can use another great feature of radare2 to disassemble hex-string:
| [0x00400600]> pad d1c0 rol eax, 1 [0x00400600]> # changed to [0x00400600]> pad d1c8 ror eax, 1 |
Let’s print the whole function to understand it more thoroughly.
| [0x00400600]> pdf ╭ (fcn) entry2.init 77 │ entry2.init (); │ 0x004005bd 90 nop │ 0x004005be 90 nop │ 0x004005bf 90 nop │ 0x004005c0 90 nop │ 0x004005c1 b87d000000 mov eax, 0x7d ; ‘}’ ; 125 │ 0x004005c6 bbff0f0000 mov ebx, 0xfff │ 0x004005cb f7db neg ebx │ 0x004005cd ffcb dec ebx │ 0x004005cf 81e314064000 and ebx, 0x400614 │ 0x004005d5 b9f6064000 mov ecx, 0x4006f6 │ 0x004005da 81e914064000 sub ecx, 0x400614 │ 0x004005e0 ba07000000 mov edx, 7 │ 0x004005e5 cd80 int 0x80 │ 0x004005e7 b814064000 mov eax, 0x400614 │ 0x004005ec 67c64050c1 mov byte [eax + 0x50], 0xc1 ; [0xc1:1]=255 ; 193 │ 0x004005f1 67c64051c1 mov byte [eax + 0x51], 0xc1 ; [0xc1:1]=255 ; 193 │ 0x004005f6 67c6405203 mov byte [eax + 0x52], 3 │ 0x004005fb 67c6406cd1 mov byte [eax + 0x6c], 0xd1 ; [0xd1:1]=255 ; 209 ;– rip: │ 0x00400600 67c6406dc8 mov byte [eax + 0x6d], 0xc8 ; [0xc8:1]=255 ; 200 ╰ ╭─< 0x00400605 e902000000 jmp main |
We see that this function named by radare2 as entry2.init and it contains a code that manipulates the main function. You can see how 0x7d is moved into eax at 0x4005c1 and then a syscall (int 80) instruction is performed at 0x4005e5. This syscall is for mprotect as can be found here. mprotect will make the code section writeable. After that, an address at the beginning of main() is moved to eax and some instructions are manipulated by the next instructions using eax and relative offsets. This is exactly where our rol became ror .
.init_array
So what is this entry2.init function and how we missed it? entry2.init, as hinted by its name, is an initialization function. The function is executed prior to the execution of main. I’ll explain it a bit more.
Before transferring control to the application, the runtime linker processes any initialization sections found in the program. The addresses of the functions which are executed by the dynamic linker are contained in the .preinit_array and .init_array sections. The .init_array section contains an array of pointers to functions which will be executed when the program starts. The section contains only function pointers and not code. These functions are also related as constructors. Like the initialization functions, there are also termination functions (destructors) which are contained in the .fini_array section. These functions will be executed when the program exits normally.
radare2 also recognized the .init_array section. Let’s print its contents:
| [0x00400600]> f~init_array 0x00600e08 16 section..init_array 0x00600e18 0 section_end..init_array [0x00400600]> pxW 24 @ section..init_array 0x00600e08 0x00400590 entry1.init 0x00600e0c 0x00000000 section. 0x00600e10 0x004005bd entry2.init 0x00600e14 0x00000000 section. 0x00600e18 0x00400570 entry3.fini 0x00600e1c 0x00000000 section. |
fis used to list the flags created by radare.
~is radare’s internal grep.
pxWis stands for print hexadecimal Words (32bit).
We can see that there are two functions in this array, including our beloved entry2.init.
Just as an extra, you can define an initialization routine in a gcc compiled programs by using a template similar to this one:
void __attribute__ ((constructor)) some_func() {

    // code goes here

}
The solution: 3rd try
So now that we know that entry2.init changed rol to ror we need to modify our script according to this new information. We’ll replace the rol lambda with ror and execute it again.
This is our new script:
# Rotate right lambda
ror = lambda val, r_bits, max_bits: \
    ((val & (2**max_bits-1)) >> r_bits%max_bits) | \
    (val << (max_bits-(r_bits%max_bits)) & (2**max_bits-1))

# Byte array from 0x004007A0, modified from the generated results of `pcp 44 @ 0x4007a0`
arr = [
    0x0F, 0xC9, 0xA8, 0x86, 0xAC, 0xE0, 0x18, 0x93, 0x8A, 0xAF, 0x91, 0xA2,
    0xE4, 0x64, 0x7A, 0x5A, 0x08, 0x8B, 0xA8, 0x9A, 0xB4, 0xD1, 0x1F, 0x84,
    0xB4, 0xD1, 0x71, 0x52, 0x1C, 0x8A, 0x80, 0xD2, 0x14, 0x95, 0x82, 0x97,
    0x80, 0xD2, 0x1F, 0x90, 0x8F, 0x91, 0x93, 0xA6
]

# Initial key value
key = 0xdc77df87

flag = []

# Iterate the array backwards
for b in reversed(arr):
    # ror the key
    key = ror(key, 1, 32)
    # xor the 8 lower bits of the key with current byte in array
    char = chr(b ^ (key & 0xff))
    # Add char to final flag
    flag.insert(0, char)

print '[+] Flag: ', ''.join(flag)
And now let’s execute it for the third time:
beet:~$ python answer.py
[+] Flag:  r2_is_for_packedup_things_like_linux_malware
ICE CREAM! 🙂
Epilogue
Here another article about radare2 is coming to an end. In this writeup I showed you more of the powers within radare2, this time its capabilities to analyze a self-modifying binary. I’m aware that it’s hard, at first, to understand the powers within radare2 or why you should put aside some of your old habits and get used working with radare2. Having radare2 in your toolbox is a very smart step whether you’re a reverse engineer, an exploit writer, a CTF player or just a security enthusiast.
If you want to learn more about radare2 I suggest you to start from the part 1 of my series “A Journey Into Radare2” and from the second part which is more exploitation focused.
As always, please post comments to this post or message me privately if something is wrong, not accurate, needs further explanation or you simply don’t get it. Don’t hesitate to share your thoughts with me.
Subscribe on the left if you want to get the next articles straight in your inbox.

Make the part three of ‘A journey into Radare 2’ ! can’t wait no more!!
your work is amazing and incredible helpful,
Greetings from Argentina
It was published 2 days ago, check it out on the main page or here 🙂
We can see that there are three functions in this array
— actually .init_array only has two functions
from iS we can see that .init_array only 16 bytes
18 0x00000e08 16 0x00600e08 16 -rw- .init_array
19 0x00000e18 8 0x00600e18 8 -rw- .fini_array
[0x004004d0]> pxW 16 @ section..init_array
0x00600e08 0x00400590 entry1.init
0x00600e0c 0x00000000 section.
0x00600e10 0x004005bd entry2.init
0x00600e14 0x00000000 section.
[0x004004d0]> pxW 24 @ section..init_array
0x00600e08 0x00400590 entry1.init
0x00600e0c 0x00000000 section.
0x00600e10 0x004005bd entry2.init
0x00600e14 0x00000000 section.
0x00600e18 0x00400570 entry3.fini —-> 0x600e18 is finit_array’s address
0x00600e1c 0x00000000 section.
[0x004004d0]>
Thank you 🙂